Christmas-themed edible prints: A seasonal guide to festive cake decorating ideas
Estimated reading time: 12 minutes
Key Takeaways
- Edible prints are fast to apply and offer photorealistic designs on cakes.
- They work well for Christmas and other holidays with careful frosting handling and storage.
- Prints sit on buttercream, fondant, or royal icing with a thin, unobtrusive profile.
- Moisture sensitivity matters—plan frosting dryness and storage to preserve color and sharpness.
- With proper application, you achieve a professional, seasonally festive finish.
Table of contents
- Introduction featuring Christmas-themed edible prints in action
- What are edible prints and why they work — Christmas-themed edible prints foundations
- Christmas-themed edible prints: Design ideas and practical tips
- Halloween cake decorations with printed icing
- Valentine’s Day edible cake toppers
- Easter egg cakes with edible designs
- How to create or source edible prints
- Practical application and troubleshooting
- Quick-win ideas and inspiration gallery
- FAQ and common concerns
- Media plan and alt-text guidance
- Reader value features
- Conclusion and next steps with edible prints
- Call to action
Introduction featuring Christmas-themed edible prints in action
Christmas-themed edible prints transform holiday cakes into stunning centerpieces with minimal effort. For broader holiday planning, see limited-edition seasonal designs. If you’re considering live demonstrations or events, explore live edible cake printing setup. This seasonal guide explores what edible prints are, why they work, and how to use them safely across Christmas and other holidays. If you’re a home baker, hobby decorator, or running a small bakery, edible prints offer fast, precise designs that look professional without needing advanced artistry. You’ll learn practical how-tos, design ideas, and ready-to-use checklists you can apply this season.
What are edible prints and why they work — Christmas-themed edible prints foundations
Edible prints are images printed onto icing sheets (sugar-based, frosting-like) or wafer paper (rice-based, translucent) using edible ink from specialized printers. They’re designed to sit smoothly on buttercream, fondant, or royal icing, with a thin profile that doesn’t disrupt the cake’s surface. This makes them ideal for seasonal motifs that are photorealistic or highly detailed.
A quick comparison helps:
- Edible prints: Fast, customizable, photorealistic designs; moisture sensitivity is a consideration, but they shine for detailed motifs.
- Hand-painted decorations: Beautiful and unique, but time-intensive and skill-heavy.
- Toppers: Create height and drama but often don’t blend with the cake’s surface.
Key reasons edible prints work well for holidays: they deliver precise images, can reproduce photographs or intricate patterns, and are quick to apply. They’re also compatible with common frostings and can be layered with other decorations for depth. Moisture sensitivity matters, so you’ll want to plan frosting dryness and storage carefully. With correct handling, you get crisp lines, consistent color, and a professional finish that feels seasonal and festive.
For more on edible icing sheets and their uses, see What Are Edible Icing Sheets? The Ultimate Guide.
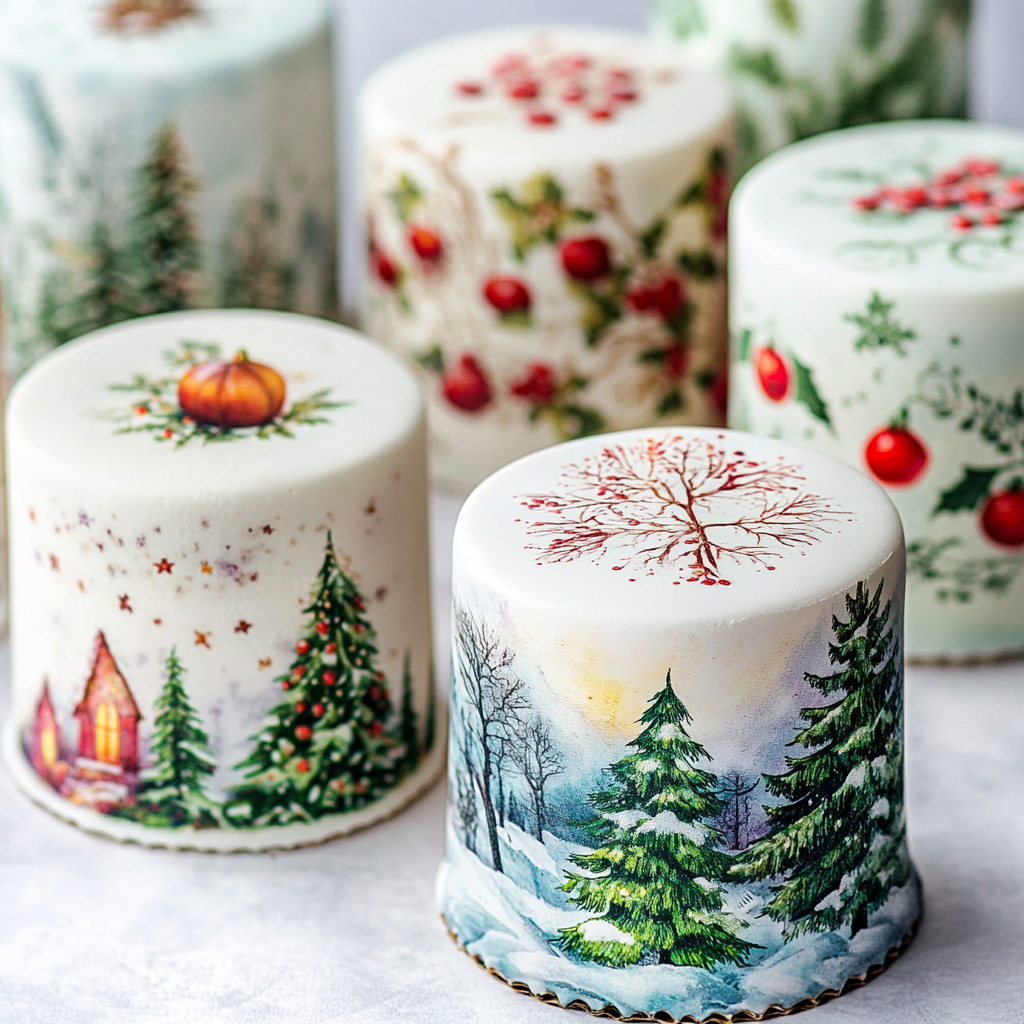
Christmas-themed edible prints: Design ideas and practical tips
Design ideas that sing for Christmas-themed edible prints include classic motifs (snowflakes, evergreen trees, holly, and typography) and more modern winter scenes like snowy village silhouettes or cozy in-house quotes. Color palettes typically lean toward red, green, gold, and white, but you can also add slate or silver for a contemporary look. Prints work best when you choose a surface that compliments the image—red velvet, buttercream spirals, or a smooth fondant canvas. For frosting surfaces, ensure the frosting is set but not crusting so the print adheres evenly without peeling.
Application tips to keep in mind:
- Size the print to the cake top; for an 8-inch cake, an 8-inch circle print is a clean fit.
- Back the print with a light layer of corn syrup or edible adhesive on buttercream so it sticks without wrinkling.
- If you’re using fondant or royal icing, place the print after the fondant or royal icing has stabilized, then smooth the edges gently with a paper towel.
- Pair prints with a white frosting border or a thin fondant frame to make the design pop.
- Add a dusting of edible luster dust for a subtle shimmer that catches the light.
Halloween cake decorations with printed icing: Spooky, stylish, and precise
Halloween prints lean into high-contrast visuals. Think spooky pumpkins, bats, skull silhouettes, and ghosts. On black or orange bases, the contrast makes the designs stand out with drama. Printed icing works well on chocolate or vanilla cakes, and you can tailor patterns from gothic to cute for kids.
Color and execution tips:
- For a watercolor ghost effect, dilute edible ink slightly before printing and brushing to the surface.
- A touch of edible glitter or shimmer powder adds depth and festivity.
- Prints adhere best to firmer surfaces like royal icing or fondant, where the edge remains crisp.
Quick-start checklist for Halloween:
- Motifs on 6-inch rounds; base the cake in a dark frosting so the print “reads” clearly.
- Peel the backing and press the print into wet icing; trim any excess edges.
- If a print looks faded, replace with a fresh sheet and reduce exposure to humidity.
- Pair with cocoa stencils or lace patterns to build depth and mood.
Valentine’s Day edible cake toppers: Romance in edible ink
Valentine’s Day edible toppers feature hearts, florals, and personalized love messages in romantic reds, pinks, and metallic golds. These prints pair well with chocolate or vanilla flavors and suit fondant-adorned surfaces or smooth buttercream canvases. Personalization adds a special touch—names, initials, or a date code can be incorporated via design software before printing.
Personalization ideas:
- Names or initials elegantly scripted within a heart motif.
- A short love note in a refined font.
- Gold or pink accents to lift the design without overpowering the cake.
Quick-start checklist for Valentine’s:
- Designs: Calligraphy hearts or love messages.
- Prep: Create a thin fondant layer on buttercream for a clean surface.
- Glue: Use corn syrup on the back; center and smooth it into place.
- Enhance: Lightly brush with gold or pink luster dust to add glow.
- Store: Keep at room temperature for 3–5 days; avoid humidity.
Easter egg cakes with edible designs: Pastel motifs for spring sweetness
Easter designs lean into pastel eggs, playful chicks, and spring florals. Prints suit egg-shaped cakes or carrot cakes that echo the holiday’s themes. Pastel palettes fit nicely on whipped cream or buttercream surfaces, and an airy, soft look is often best achieved with careful layering of colors.
Layering and texture tips:
- Use icing sheets to achieve good opacity and crisp lines even on lighter backgrounds.
- Drape sugar veils for a delicate, ethereal effect around the edges.
- For kid-friendly cakes, combine cheerful prints with simple hand-drawn elements in frosting.
Quick-start checklist for Easter:
- Motifs: Pastel eggs or spring florals.
- Cake: Egg-shaped or carrot-based base for thematic appeal.
- Apply: Print on a set frosting; press lightly to avoid distortions.
- Troubleshoot: If moisture causes issues, dry the cake completely before adding the print.
- Finish: Edible glitter borders for extra sparkle.
How to create or source edible prints
Printing options:
- At-home printing with edible ink printers gives you control over size, color, and timing.
- Pre-printed icing sheets from baking suppliers save time, especially for a busy season.
Image sourcing, licensing, and design tools:
- Use royalty-free images or create your own designs in simple software like Photoshop or free equivalents.
- Ensure you have permission for any imagery you print, especially if you’re selling prints.
Safety and storage considerations
- Use food-grade edible ink and certified sheets designed for frosting surfaces.
- Store prints in airtight bags away from moisture; shelf life for decorated cakes is typically 3–5 days.
- Avoid contact with heat or direct sunlight to prevent fading.
Tools and sources
- Edible ink printers
- Pre-printed sheets from baking suppliers
- Basic design software for layouts
Practical application and troubleshooting: Step-by-step quick-starts and fixes
Quick-start approach that works across holidays:
- Bake and frost the cake; let it cool completely.
- Choose and print the edible image; cut to fit the cake top.
- Prepare the surface with a light glaze of corn syrup or edible adhesive.
- Apply the print, pressing from the center outward and smoothing gently.
- Allow to dry briefly; store properly if not serving immediately.
Common issues and fixes:
- Peeling: Ensure the frosting is smooth and dry; apply a thin layer of edible adhesive.
- Fading: Avoid humidity; use fresh prints and stable storage conditions.
- Moisture sensitivity: Work quickly in a dry area; re-seal unused sheets immediately.
For troubleshooting guidance, see Common Problems with Edible Printing and How to Troubleshoot Them.
Storage and transportation
- Keep decorated cakes at room temperature in a cool, dry place.
- Transport flat and avoid heat; moisture is the enemy of prints.
Quick-win ideas and inspiration gallery
- Multi-holiday bundle: Create a single cake set with mixed motifs (e.g., Christmas tree, Halloween bats along the edge).
- Watercolor effect: Dilute the ink slightly for a soft, painterly look.
- Budget-friendly sourcing: Check local baking supply shops for printed sheets or quick-turn custom prints.
- Gallery prompts: Before/after shots of printed vs. plain cakes; color palette swatches showing how prints complement frosting.
FAQ and common concerns
- Heat-safety: Do not expose prints to baking heat; keep surface temperatures under 75°F when possible.
- How long do edible prints last? When integrated into a cake, they’re good for about 3–5 days; if decorating separately, store prints as advised and apply close to serving.
- Reuse and safety: Prints are typically single-use; reuse is not recommended due to moisture and adhesion issues.
Media plan and alt-text guidance
Image ideas by section:
- Christmas-themed edible prints: before/after shots, color palette swatches, close-ups of printed sheets.
- Halloween cake decorations with printed icing: high-contrast base with spooky motifs.
- Valentine’s Day edible cake toppers: romantic layouts with gold accents.
- Easter egg cakes with edible designs: pastel palettes on egg-shaped surfaces.
Alt-text examples (include exact keywords where relevant):
- Before/after cake shot: “Christmas-themed edible prints before/after on festive cake”
- Step-by-step application: “Halloween cake decorations with printed icing step-by-step”
- Close-up icing sheets: “Valentine’s Day edible cake toppers close-up” and “Easter egg cakes with edible designs close-up”
Reader value features
- Quick-start checklists for each holiday, designed for fast reference.
- A sourcing guide for edible sheets, inks, and printers, focusing on safe, food-grade options.
- Simple templates and prompts to customize designs, including family initials or local motifs.
Sourcing and safety sidebar
- Always verify that sheets and inks are food-grade and approved for icing surfaces.
- Check licensing for any printed imagery, especially for items you’ll sell or share publicly.
- Store prints and tools in a clean, dry environment; regular checks for moisture or heat exposure help preserve color and adhesion.
Conclusion and next steps with edible prints
Edible prints bring professional-looking holiday artistry within reach for home bakers and small bakeries. They combine speed, precision, and safety with the joy of seasonal decorating. If you’re ready to try a small project, start with a Christmas-themed edible prints centerpiece on a smooth buttercream cake, then branch into Halloween, Valentine’s, and Easter designs as you gain confidence.
Call to action
Download your printable planning sheet and explore our resource library for edible print ideas. And we’d love to see your results—share photos and notes in the comments to inspire other readers.